Building website with Hugo and RMarkdown on your local computer
Step by step guide for beginners
 Image credit: SMU
Welcome
TL;DR
This is a very detailed guide to install the Hugo framework for building websites through the wowchemy template on your local computer with Windows operating system. If you plan to host your website on Github, you should refer to the guide here. If you are using MacOS, this guide may also be relevant although you may need to change some commands. If you are using Linux, this guide is not for you.
Background
Why did I write this post? This is a long story and I hope to keep it short:-).
My first website was built with Frontpage when I started my PhD study at HKUST in 1998. I moved the website from HKUST to SMU when I started my academia career in 2003. Since 2017, I started to explore to incorporate data science knowledge into accounting curriculum and have led the efforts in launching the first accounting Masters' degree in Accounting Data & Analytics. Since then, I started to use R for teaching and research, and also gradually move to Python. My goal is to eventually become bilingual in both R and Python. In the learning process, I read a lot of blogs on data sciences and noted that many blogs are using very interactive template, especially suitable for incorporating R or Python code in the web pages. As I am also using RMarkdown to prepare course materials including slides and assignment, I have the intention to publish some to share with the public.
Then I started to notice some website templates used by many data scientists. I decided to try Hugo as it is one of the most popular framework I can find through google search.
My old website is hosting through the university server and I have a webdrive within my university network which enables me easily change the content of the webpage. So what I want is to modify the webpages and then copy them directly to the webdrive of my university server. So I need to install the Hugo framework on my local computer. Once again, if you want to host it through Github, you can stop here and refer to the guide here.
Install Hugo on Local Computer
My guide is based on the wowchemy guide and I believe my guide is much clearer. Also I am from non-computer background although I have much more knowledge of computer than many people around me as I studied a lot of computer elective courses at my undergraduate studies at Xi’an Jiaotong Univeristy. Thus my guide may be easier to understand for non-computer background friends.
Okay, get ready and let’s go.
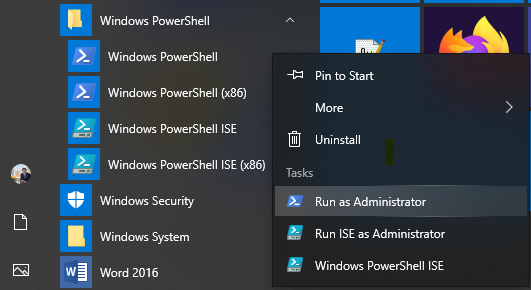
Run “Windows PowerShell” as Administrator
If you don’t know what the above title means, you are definitely from a non-computer background. The Hugo framework needs to run some commands through the Windows command terminal called “Windows PowerShell”. I trust your Windows should have it. If not, you can google and install it from Microsoft.
To run it, just click the Start icon, mouse over and right click on Windows PowerShell, and then click “Run as Administrator”, as shown in the screenshot below.
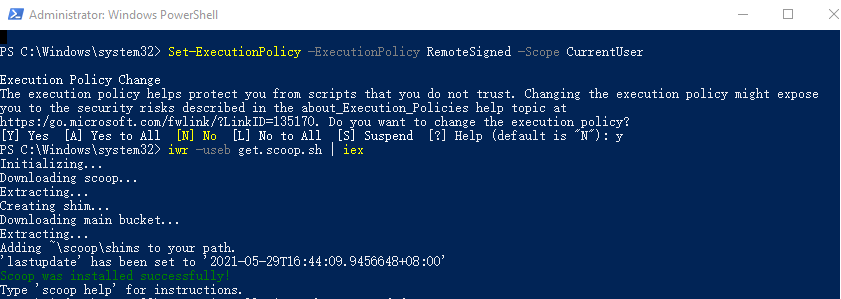
Install Scoop package manager for Windows
Scoop is the Hugo package manager for Windows. To install it, just paste the following commands into Powershell and press the Enter ↵ key:
Set-ExecutionPolicy -ExecutionPolicy RemoteSigned -Scope CurrentUseriwr -useb get.scoop.sh | iex
Press Y and Enter if asked Do you want to change the execution policy?.
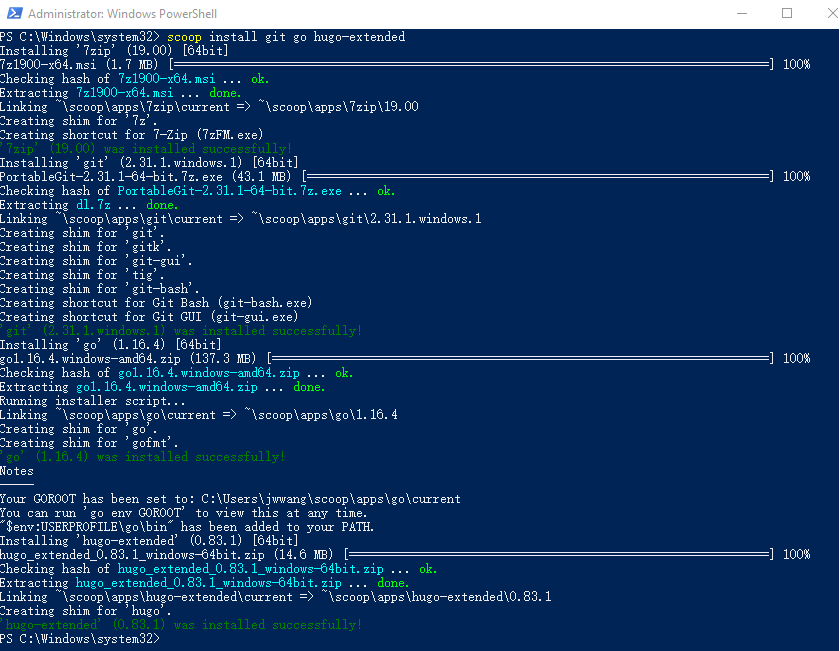
Install Hugo and its dependencies
Next, you need to use the scoop command to intsll the Hugo. Just copy the following command into your PowerShell command line and press Enter.
scoop install git go hugo-extended
The above command installs Git, Go, and Hugo-extended on the Windows system, which is required to run the Hugo framework. You may not need to use Git and Go if you don’t host your website on Github. Anyway, it is package from the scoop package manager.
Download Hugo Academic Template
Now you can start to download to your local computer the Hugo Academic Template here and then unzip it into a folder for your website.
Or you may use Git to clone it directly to your local folder, just copying the following command into PowerShell and then press Enter:
git clone https://github.com/wowchemy/starter-academic.git
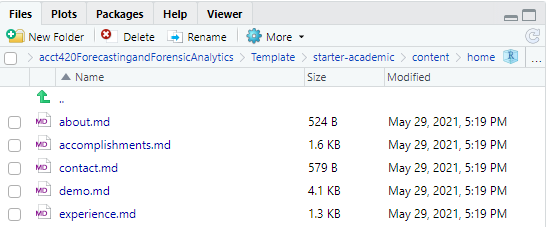
Note that Git will download the template files into “starter-academic” folder which is under the current PowerShell folder (such as “C:\Windows\system32\” as shown in the following image). You need to copy the whole template folder to a folder you want to host your website on your local computer.

View your local website
To view your local website, you need to first navigate to your local folder “starter-academic” using the “cd” command, for example
cd d:\mywebsite\starter-academic
Then run the following command to view the site:
hugo server
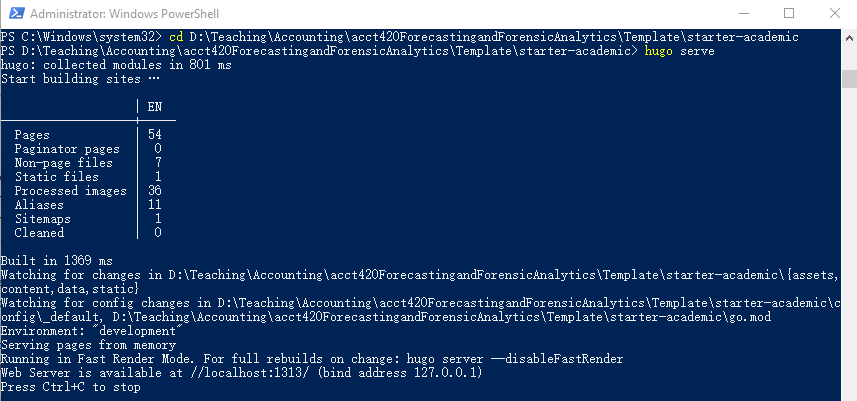
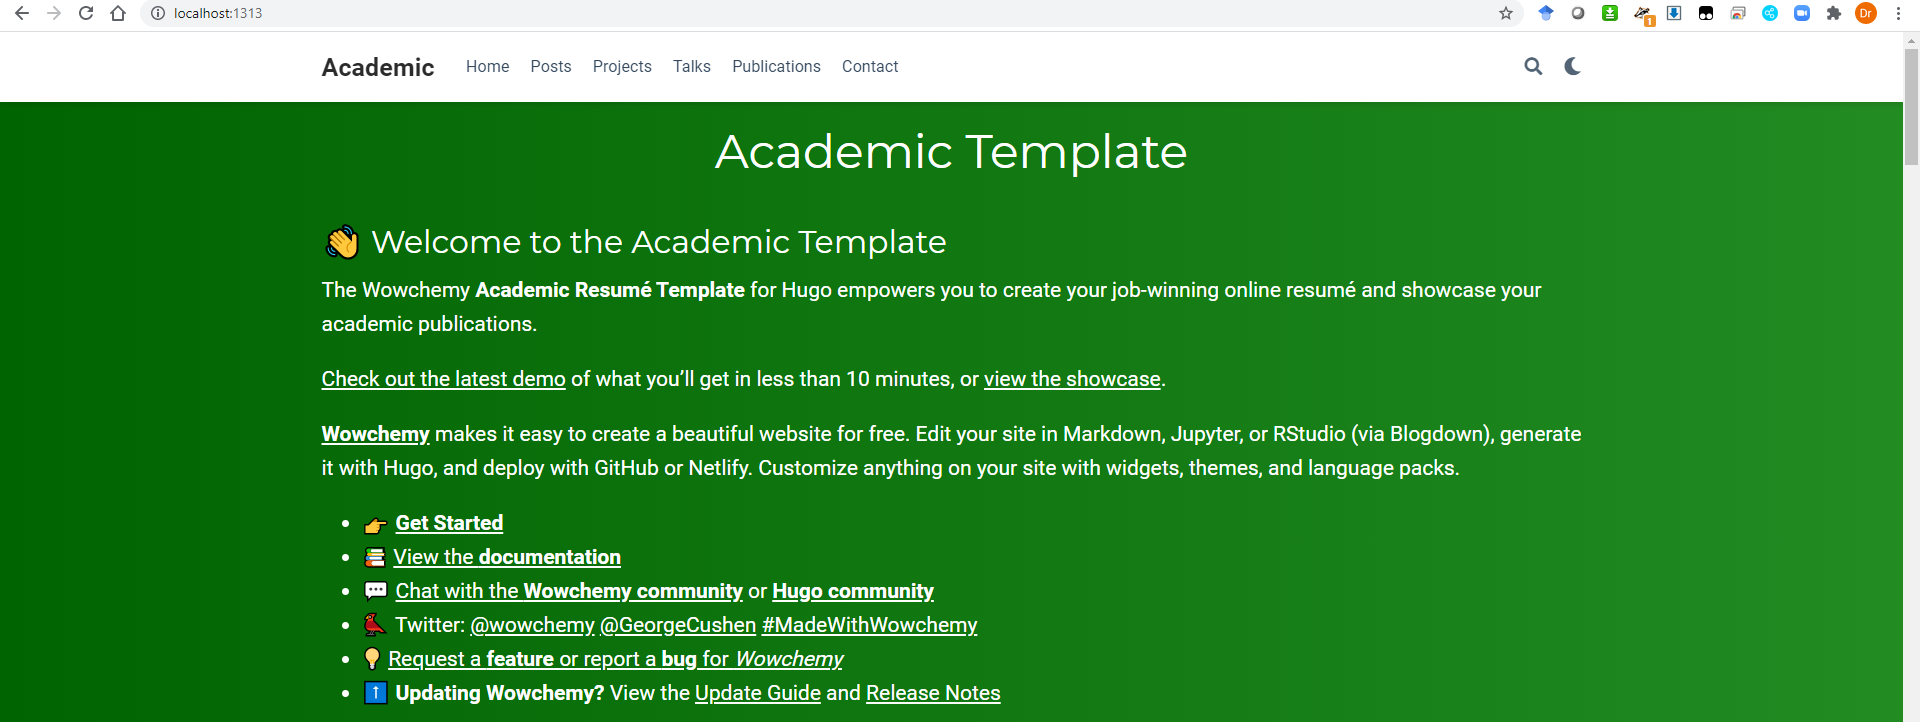
The system will then start to build the website on your local machine and will generate a website link like “//localhost:1313/”. You can now use your favorite web browser to view the local website as following. Now you are ready to modify with your own contents.
Install a Markdown Editor for Hugo
The following guide is based on the wowchemy guide.
As Hugo is mainly using Markdown format for content editing, we need to install an editor for Markdown. RStudio is my choice as I am using R.
Open RStudio and install blogdown package
If you are not familiar with R and RStudio, I don’t think you should read this post.
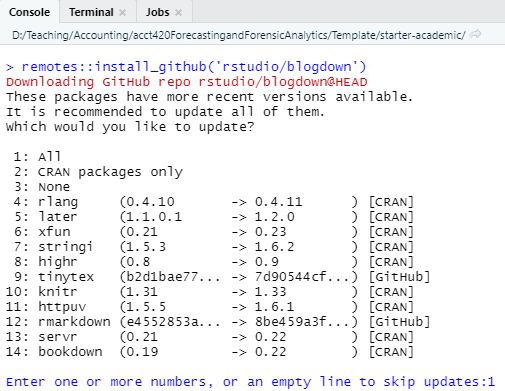
remotes::install_github('rstudio/blogdown')
Depending on the version of your installed packages, you may be asked to update some dependency packages. I recommend update All by input number 1 as shown below. Relax and it may take a while.
Open “academic.Rproj” file from your site’s folder
This is an RStudio project file, just double click the file and it should be opened by RStudio by default. Alternatively you may also open the project from RStudio by clicking “File” and then “Open Project” directly.
Copy “config/_default/config.yaml” file to your site’s root folder, ie, “starter-academic”
If you don’t find the YAML file in the root folder, you need to manually copy it to the root folder. If you don’t do so, you may not run the local server using the next step. Note that this is for using RStudio to manage your sites. If not, this should not be necessary.
Run your website using RStudio
In the RStudio menu bar, choose Addins > Serve Site (clicking this button will call blogdown:::serve_site())
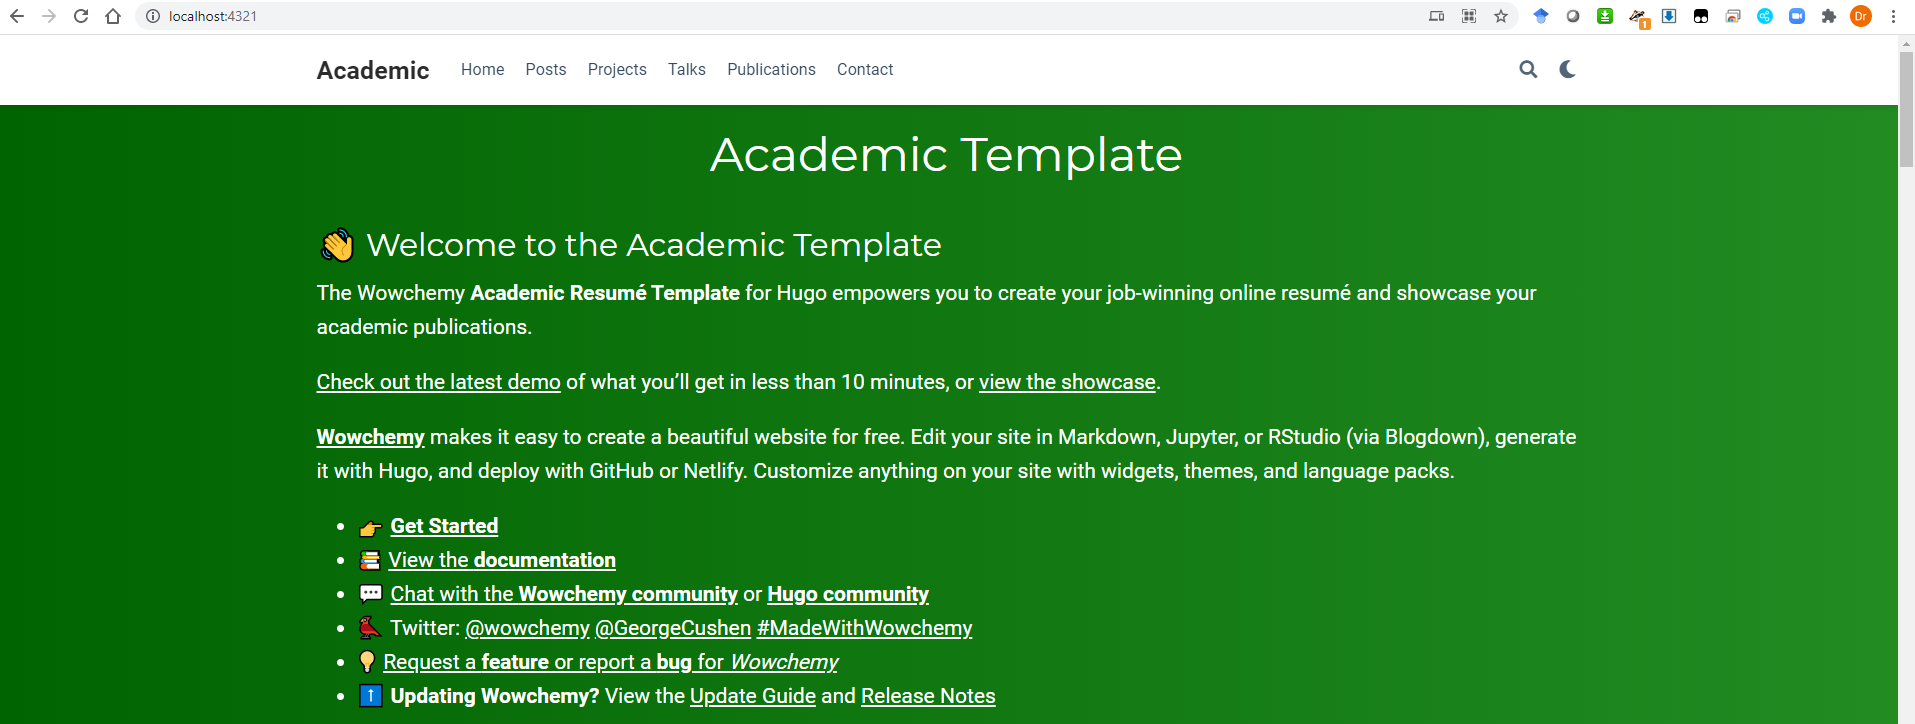
It will show the following and give you a website link for the local website (eg., http://localhost:4321/).

View your local website using the link from the previous step
Type http://localhost:4321 into your favorite broswer and it should show your local website as following:
Create Website Content through RStudio
The following guide is based on the wowchemy guide
There are 3 main folders for Hugo sites:
content/: Markdown-formatted content files (homepage, etc.)assets/media: media files such as images and videosconfig/_default/: site configuration files
Config your website
Let’s first look at the config/_default/ folder:
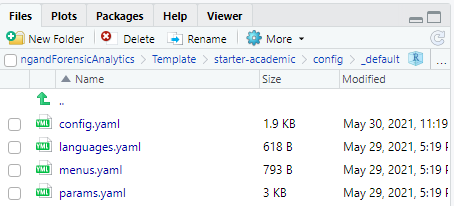
The Academic Template has four configuration files which contain important settings for your site. You can edit the files through your RStuido directly. It will take some time to figure out which is what.
Note that although we have copied config.yaml to the root folder, we need to modify the file under the config/_default/ folder. Any changes to the root folder file does not change the setting of your site.
Change your site contents
The main content setting is under the content/home/ folder.
These files are settings for widgets, ie, the sections on your homepage. Set the active parameter to either true or false for each widget depending on if you wish to display it or not.
# Active this widget? true/falseactive: true
If you don’t see the above parameter, just copy it to the file and set it true or false.
These widgets display relevant sections on your homepage and the menu needs to be changed accordingly. To change the menu bar, you need to edit the config/_default/menues.yaml file.
Now it is ready to create your first page, be a blog post or a talk presentation slides.
As we are using the blogdown package, we can type the following command in the R console:
blogdown::new_post(title = "Building your website with Hugo and RMarkdown", ext = '.Rmarkdown', subdir = "post")
The command will automatically create a folder under content/post with today’s date and the title of your post. Do note that you need to work on the index.Rmarkdown file rather than the index.markdown file. Then go ahead to edit your first post with the RMarkdown format.
You may also create a .Rprofile file and add the blogdown options as default. Then you don’t have to specify ext and subdir parameters every time you create a new post.
In your R Console, use the following command to set up the .Rprofile options
# if exists, opens; if not, creates newblogdown::config_Rprofile()
I suggest you add the following options as default.
blogdown.author = "Wang Jiwei / drdataking.com",blogdown.ext = ".Rmarkdown",blogdown.subdir = "post"
You need to restart your R session to make the .Rprofile work. Once done, you may just use the following command to create your new post:
blogdown::new_post(title = "Building your website with Hugo and RMarkdown")
The above command will automatically create a new post with all the default options specified in the .Rprofile file.
When you are done with your editing, you may start to generate the pages which can be deployed to any website hosting site. Just type hugo command in the PowerShell terminal. You may press Ctrl + C to halt the hugo server and back to the command line.
After running the hugo command, it will automatically generate a public folder which contains all the files to be deployed to the host site. Just copy or transfer all the files under the public folder to your hosting site. For my case, I am using my university hosting site and I just copy all files under public folder to my web drive which is the hosting site provided by my university. Then you may use your hosting site address such as http://www.mysmu.edu/faculty/jwwang to view your web site. However, it seems it does not show the homepage properly as shown below.
I googled and found out it is due to a wrong baseurl in the config.yaml file. I changed it to the correct url and it works like a charm.

Add existing repo to Github
I have finally decided to add this existing repository/Rproject to Github. It is fairly easy by following the github docs. To use gh command, you need to install Github CLI first. You may do so using conda install gh --channel conda-forge.
I also setup the free website hosting with netlify.com. The good thing is that it can build website from Git repository and automatically update the website after you push the changes to Github.
Upgrade Hugo
Hugo keeps growing and you may have to upgrade it when some functions start to deprecate. The following commands are useful:
hugo versionto check the current version on your systemscoop serach hugoto check the most recent version of Hugo installed in your current scoop package, typically it will be the same as your Hugo version as you installed Hugo through scoop in the first place.scoop updateto update scoop to its most recent managed package of Hugo, when done, you can check usingscoop search hugoagain to see the Hugo version which should be higher than your current Hugo versionscoop update hugo-extendedto upgrade Hugo to its most recent version which is managed by the scoop package manager.- if the update failed (most likely due to Access Denied as you may be working on something with Hugo), close all your command terminals, try
scoop uninstall hugo-extendedand thenscoop install hugo-extended, it should work - try
hugoon your site root folder to see whether it works. If error message likethe requested operation cannot be performed on a file with a user-mapped section open, save all your unsaved site/blog files should work.
Summary
Let me summarize the steps to create/edit your site, assuming the Hugo framework has been correctly installed on your computer.
- Run the “academic.Rproj” file to launch the R Project
- Run
blogdown:::serve_site()in the R Console to launch the site. Don’t stop the server (blogdown::stop_server()), otherwise it will not automatically render your changes into markdown. - Run
blogdown::new_post(title = "My Post", ext = '.Rmarkdown', subdir = "post")to open a new post. If you have set up the .Rprofile, you don’t have to specify theextandsubdirparameters. Just changesubdirto the desired folder if you want to create a new page under different category. - You may also use the RStudio IDE Addins to launch the above commands automatically.
- Edit
index.Rmarkdownfile, save it, the blogdown server will automatically render it into aindex.markdownfile. I suggest just save but not knit as somehow my knit will create both html and markdown and it takes longer than saving only (ie, rendering to markdown only). Usehttps://source.unsplash.com/random/1280x720/?natureto include random pictures (it seems this does not work anymore). Or usehttps://picsum.photos/1280/720?random=1. - Run
hugoin the PowerShell command line under the site root directory and it will automatically generate the site in thepublicfolder - Copy all files in the
publicfolder to my university hosting website (I need to figure out how to automate this process). As this is a static website, you may copy any other static files such as html and pdf which are not generated through Hugo to the server directly (to avoid copying too many files every time). - To push to my github repository and netlify website,
Commitall the changes and thenPushto github, netlify will automatically deploy the changes. If there is any issue with git in RStudio, change its path toC:/Program Files/Git/bin/git.exe. - Done
Finally I have made it. It took me a few days to figure out all the procedures (don’t trust the website saying building your website in a few minutes:-)). I hope you find this post useful. Enjoy your new website.
Troubleshooting
When I tried to revisit this page a few days later, I encountered an error but I did not change anything since my last edit. So I am adding the troubleshooting section here for my future reference.
failed to resolve output
When I tried to launch the server through either hugo or blogdown, it says Error: from config: failed to resolve output format "WebAppManifest" from site config. I found the solution here. However I could not find any temp directory. Here is my solution:
- Temporarily remove the “WebAppManifest”, “redirects”, “headers” output types from your
config.yamlunder theconfigfolder (not the root folder) and run the following commands through Windows PowerShell:hugo mod cleanandhugo mod tidy - Check that hugo now runs OK with hugo server or blogdown and then add the output types back into your
config.yaml.
failed to extract shortcode
Another error message when launching the site: failed to extract shortcode: template for shortcode "callout" not found. I don’t know why as I did not change any of the server settings. According to this thread, it is due to the missing modules of the academic theme. Use the following code in the root directory (ie, your website directory):
hugo mod clean # clean all modules
hugo mod get -u ./... # reload all modules
Last updated on 13 March, 2022
Wang Jiwei
Associate Professor
My current research/teaching interests include digital transformation and data analytics in accounting.